Friday, September 21, 2012

New Queen... QFTD131

 
I made this card for Queen 131.  You can find the Queen for the Day Challenge here.
 
I used colors from Fab Friday - So Saffron, Sahara Sand and Basic Gray.

 
I really love this set because it is so versatile!

Thursday, September 13, 2012

New Queen... QFTD130

 
This card is for Queen Loll. 
I also combined a number of other challenges.
The colors are from The Paper Players - baja breeze, gray, black
Ways to Use challenge - markers
 
I used a die cut negative of a snowflake and popped it up overtop of another piece of white that I used markers to color in shades of blue and gray.
 
The middle piece is using the boho blossoms punch and I cut and crumpled it and used a mini brad.
 
I hope you come play at the Queen for the Day Challenge.


Tuesday, September 11, 2012

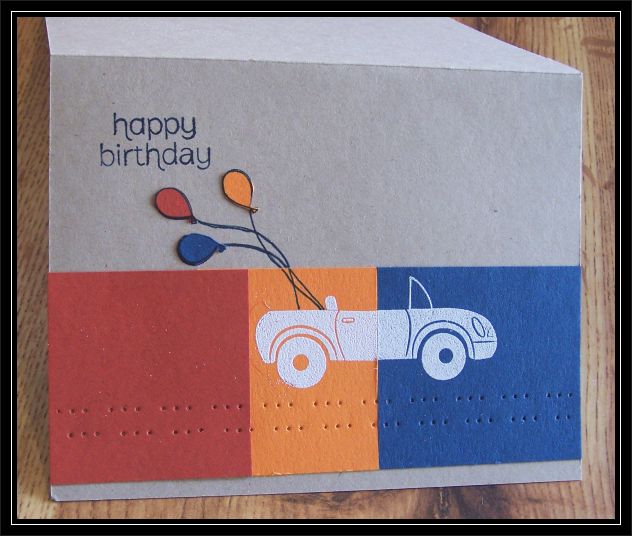
Birthday car - color blocking

 
Yippee, I'm getting back into the challenges again!  This card is for 3 challenges.
1) - color challenge - cajun craze, pumpkin pie, midnight muse
2) - CAS color blocking
3) - Clean & Simple Fall to Layout #207

 
Great male birthday card.  I love how it turned out.  The car is embossed with white and I paper pieced the 3 balloons and added two rows of piercing.

Monday, September 10, 2012

Clear Block - Summer Afternoon

 
A very simple card using a layout from Sketch Frenzy Friday.
 
I inked a clear acrylic block with green and pressed onto the white paper, then stamped the line image from "Summer Afternoon" overtop.  It's quite hard to see from the photo.  It's a subtle effect but is a nice and easy way to add color to this image.

 
I added a zig zag from "Tasteful Trim" die and a little twine bow.
The colors are Wild Wasabi and Certainly Celery with Chocolate Chip and white.

Thursday, September 6, 2012

New Queen... QFTD129

My two cards for the QUEEN this week.  Come take a look at the Queen for the Day Challenge and come play along.
 
I loved Peggy's layout for this card.  Actually the angles of the triangles were the hardest part to figure out.  I mixed a few oranges (not my usual go-to color) and made this with a cupcake so it would be suitable for boy or girl (or even adult!)  I loved the brads on Peggy's card too, but I didn't think with the shape of my sentiment it would work very well, so I tried a bit of white twine.


I love her very simple bike on kraft.  I tried a few different colors, although I loved hers.  I also changed the placement of some things.  I added some piercing and faux stitching in the corners and am not sure if I like it.  I think it makes it a bit too busy.  The colors of this are kraft (crumb cake), real red, baja breeze and midnight muse.


I colored the bike image with the midnight muse marker except for the flowers I colored in the lighter blue and red.

Tuesday, September 4, 2012

General Masculine Trees

I made a card today for 2 challenges.
 
The colors are from Splitcoast - Chocolate Chip, Basic Gray and Gumball Green.
I inked my embossing folder with gray and embossed the gray textured paper for the bottom layer (apothecary accents framelit).  I stamped the trees twice and cut out with a framelit and layered with the decorative label punch in green and a hand-cut banner shape in brown.  Added a button to one side.
 
The bottom of the card I cut with a decorative edge framelit and added a layer of green.
 
The layout is from Stamping 411 (their last one!)

 
I thought this would work well for an all-purpose masculine card.

Friday, August 31, 2012

Mustard and Gold - Evergreen

 
Today I finally MADE A CARD!  I found a NEW blog challenge today and thought I'd try it out.
 
The layout comes from the brand new Fab Friday blog.
To find some colors to go with it I searched through some other blog challenges and found this at Just Add Ink - MUSTARD and METAL!


I used my favorite set "Evergreen" with the colors More Mustard and can you believe it - Summer Starfruit!!!!  With some black I think this makes a great color combo (and something a little different).  I stamped the trees with the two colors and then versamark with the outline image and embossed the trees and both sentiments in gold.  The sentiments are from the set "Beautiful Season".
The oval with clip is popped up.

I added a decorative edge (framelit) and some piercing.  I'm quite happy with how this turned out and I continue to LOVE this versatile stamp set (I even used it for a Christmas card this time!)

Thursday, August 30, 2012

New Queen.. QFTD128

Here are the two cards I made for this week's Queen.
Both cards are using this week's fabulous color combo - Rich Razzleberry, Daffodil Delight, Lucky Limeade.

For this card I tried the "seamless tiers" technique.  Actually worked a lot better than I expected and was VERY easy!
I cut my 3 white pieces in the sizes that I wanted them, for layering.  I laid them on top of each other and stamped!  So I only stamped one time for each leaf.  This means you don't have to line up any layers with stamping them separately.  This ONLY works because you put the other layers of color behind each white piece to mat (it covers up around the edges where the stamp can't push down properly.)  It creates a really cool WOW effect and is actually really easy to do!  I enjoyed it.
 
I pierced around the sentiment and added some brads. 


For this card I took a piece of black textured paper and die cut two shapes from the apothecary accents framelits at the same time, one inside the other.  So it creates a frame.  The bird image is actually BEHIND the opening in the frame.

I stamped the bird silhouette in black and then just swiped color with my markers across.  It actually looks really cool for such a random technique.  I think this works because it is a silhouette image.
 
I added a sentiment (from Easy Events) in a word window punch, with mini brads and some twine.
 
I'm quite pleased with how both of these turned out!
 
I hope you come join along with the Queen for the Day Challenge here.

Thursday, August 16, 2012

New Queen... QFTD126

I made these two cards for our Queen this week...


 For this first one I brayered a sunset.  This is what it looked like without stamping...
I masked off the bottom left corner with a piece of torn paper.  I brayered yellow, then orange, then red.  I took the paper off and sponged in brown and black in the bottom area (so it hopefully looks like a hill).
I stamped the trees with Staz On black, but it didn't show up as well as I wanted, so I colored the image in with black marker.  I'm really pleased with how this turned out.  The trees are from "Evergreen" and a retired set "Branch Out"

For this card I used my square punch and punched out 6 pieces of patterned paper.  Added a piece of ribbon with a stapler, punched out the sentiment and pierced some holes and used a marker to connect the dots (faux stitching).
Really simple to make.  I used some colors I don't normally put together and I'm happy with how it looks.

I really hope you come play along with the Queen for the Day Challenge.


Monday, August 13, 2012

Water Stamping with leaves

I made this card for last week's layout on Splitcoast.  Such a pretty layout, although I think I took a bit of liberty with it.

The colors are: Cajun Craze, More Mustard, Summer Starfruit, white, with a bit of always artichoke


I used twine, brads, oval and modern label punch.  The embossing on the mustard is houndsooth.

I made the background circle by sponging colors on glossy paper, then I wet my stamp background and stamped it on.  I used french filigree background.  I found the technique on Splitcoast - Water Stamping.

The leaves I made by coloring the image with markers and stamping on summer starfuit paper and more mustard paper and cutting them out.

Overall, I'm pretty happy with how this turned out and think it makes a nice masculine card.

Thursday, August 9, 2012

New Queen... QFTD125

I made these two cards for our Queen this week...
Come join in the Queen for the Day Challenge.

 This first card uses a combination of 2 stamp sets - Evergreen and Serene Silhouettes.  I just love how it turned out.  The layout was from Barb's card, except I changed the placement of the sentiment.
The sentiment is from Evergreen too.  It says...  "Remembering with you that silent night so long ago and the Savior's gift of peace, hope and love that fills our hearts today."

I made this card using Barb's layout again.  Love her dark red layers behind everything. 
I colored the image with markers.  I purposefully twisted the ribbon so there would be loops like that.  I like it.

Monday, August 6, 2012

Tree of kindness


It's been so long since I've made a card for any internet challenges, I wanted to make the time today to get back into it.

The Technique challenge at Splitcoast today was to choose a background technique.  I chose embossed embossing.  I used the new GUMBALL GREEN cardstock, embossed it through the Big Shot with the argyle embossing folder.  I rubbed it with the embossing buddy and used BLACK embossing powder to heat emboss it.

I used two of my new stamp sets "Evergreen" and "Blooming with Kindness".    I stamped the tree twice, then doodled my own frame with black and green markers.  The sentiment is also embossed in black.

The layout is roughly from Clean & Simple Stamping.

Thursday, August 2, 2012

New Queen... QFTD124

I made these 2 cards for the Queen for the Day - #124 - Queen Sue!

For this card I used the tree image from "Serene Silhouettes".  One of the reasons I bought this set was to use this tree image for masculine cards.  I colored the tree with midnight, basic gray and black and then spritzed with water.
The colors on this are: Midnight Muse, Sahara Sand and black.
I reached for some items I haven't used in a LONG time, eyelets (and the crop-a-dile) and twine.


This card was made using a color challenge.  Primrose Petals, Baja Breeze and Summer Starfruit.
I minimized the Starfruit because I didn't want it to overwhelm.  I stamped the flower image in baja breeze ink on the same color paper for a subtle look. 
I had some fun with shapes, piercing, rhinestones and the fun new ribbon.


Hope you come join in with the Queen for the Day Challenge here.

Thursday, July 26, 2012

New Queen.. QFTD123

Here are the two cards I made for this week's Queen...
Come play along with the Queen for the Day Challenge that I host on Splitcoast.


For this card I used the images from "Easy Events" and two of the Apothecary Accents framelit shapes.  I scored the background.  Added some fun edges, ribbon and mini brads.  I colored some of the image in just with yellow.


 For this card I used "Serene Silhouettes" and a framelit shape and beautiful wings embosslit butterflies.  I also used the vintage wallpaper embossing folder and textured paper.  I pierced holes and connected the dots with a purple marker on the top and bottom edge to make it look like stitching!  The ribbon is organza ribbon.

Thursday, July 19, 2012

New Queen.. QFTD122

Here are the 2 cards I made for this week's Queen for the Day.
Please come join in with the Queen for the Day Challenge.
I inked my clear block with yellow maker and pressed it onto the white paper.  Then I stamped and added brads.  Really simple card, took about a minute or two to make.


For this card I used my new set "Evergreen".  I stamped the tree with white ink on the green paper, then I inked the words with green and stamped overtop.  I added some fun decorative accents and embellishments.