Showing posts with label framelits. Show all posts

Friday, November 8, 2013

2 Evergreen


Making some Christmas cards.  These one combine the stamp sets "Evergreen" with "Festive Flurry".

Monday, September 23, 2013

Small Poinsettia - framed

I made this card for our Queen this week.
I used 4 framelits to make the frame.  I cut out two of the "inside" of the Poinsettia in Joyful Christmas and layered them.
There are black glimmer brads on top and bottom.

Tuesday, July 23, 2013

Layered Lattice Punch Art

I was playing with my lattice die and the windows framelit collection to make this layered "punch art" card.  There are 6 layers of the lattice (white behind tips, green in between window framelits, wisteria rounded with tips cut off, green, white flower, purple center)
I used two layers of window framelits - razzleberry patterned paper and olive patterned paper.
I cut the dotted scallop ribbon punch in half for the edges.
Added a few rhinestones for some shine.
The white "flower" is popped up with a stampin' dimensional.

 
I kept it blank - will be useful for many different purposes.

Monday, July 15, 2013

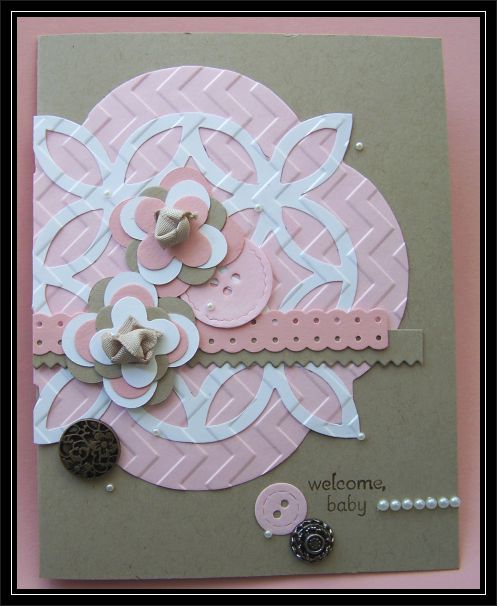
Retro Lattice Baby

 
Playing along with the Retro Sketches Challenge Blog.

 
Love how this turned out.  Lots of details - embedded embossing (lattice in window frames die), floral fusion flowers with scrunched ribbon centers.  Antique brads, pearls and buttons and two edges!
 
The colors are crumb cake, pink pirouette, blushing bride & white.

Sunday, June 2, 2013

2 butterfly cards

 
I got some crafting time today so here is what I made.  Punch art trees with butterflies.  There is a close up view below.

 
This is called a telescoping card.  It swings open on the brads to reveal layers underneath.  This first picture is the "closed" view.

 
This is all 3 layers.  And a close up.  I used the secret garden framelits and layered 4 flowers with some sponged tips.


Here's a close up of the punch art trees.

Monday, May 20, 2013

Masking & Sponged

 
I masked the square shape with scrap paper and sponged it.  Very simple card to make.

 
First I stamped the leaves, then masked them.  I used apothecary accents framelit negative shape to mask and sponged it in with yellow.  Another very simple card.

Wednesday, May 1, 2013

Creative Crew - Design Team!

I'm quite excited.  I've been asked to be on the Design Team for the Creative Crew Challenges on Splitcoast for 4 months.  This is a challenge for Stampin' Up! demonstrators!
Here are the projects I created for this month's 4 challenges.  Hope you come play along.  You can find the challenge here and the challenge gallery here for all the projects.


Thursday, March 28, 2013

New Queen... QFTD158

Here's my card for Queen 158 - Sharon (smadson).  Feel free to join in the Queen for the Day Challenge.


I used 2 framelit shapes and pierced the inside one.

Wednesday, March 6, 2013

2 for 2

I'm home on a sick day with my son, so I have some time to make cards!!  (I'm not neglecting him, he's feeling mostly better now and playing happily!)

I took two challenges - color challenge and a layout and made 2 different cards with some of the same elements.  The color challenge is from Splitcoast from last week - more mustard, old olive and midnight must (I also used very vanilla).
The layout is from Retrosketches.  I made one vertical and one horizontal.


  I made this one to be a male birthday card.  I used chevron embossing and a glimmer brad.  See how I cut the framelit shape (green) to be only behind the top half.

 For this one I embossed with pewter the music notes in the background.  The flower is 3 layers cut out and popped up on each other.  I embossed on the flag strips and also used my new Simply Scored plate for some scoring patterns on the bottom of the card.  Added two buttons to finish it off.

Sunday, February 17, 2013

Popped up Poppies!

Popped up a coral poppy on top of a circle on top of a framelit. Also cut a larger framelit out of the DSP.  The other poppies are slightly colored in with marker.

Saturday, February 9, 2013

New Framelits

2 more cards using my new framelits!
 
For this one I put the framelit on a bit of a different angle and pierced a circle inside of it.
I embossed and used a glimmer brad on the heart.
The layout is from CAS(E) this sketch!

 
Colors: Primrose Petals, Basic Gray and Pool Party
Stamp set: Secret Garden

 
For this one I used the smallest size framelit.  I used it to cut out only a portion of the big heart image from "You are Loved".  A very simple layout.

Colors: Pretty in Pink, Primrose Petals, Midnight Muse, White
Stamp set: You are Loved

Tuesday, February 5, 2013

NEW STUFF!

 
Yippee.  Got some new stuff today!  And I'm excited that blogger is even posting my pictures again, so I can show you what I made today!
 
I'm playing around with the window frames framelits and lots of texture!
 
On the top card I used 2 different embossing folders and also scoring!  Buttons for the center of the secret garden flowers.
 
The layout for the top card is from Try Stampin' on Tuesday.

 
On this card I pierced around my apothecary accents framelit.  I used some silver glitter paper and glimmer brads.
 
I kept both cards without sentiments so I can add something when the need arises.

Saturday, January 12, 2013

Yellow & Blue Secret Garden

http://www.splitcoaststampers.com/gallery/photo/2311611?&cat=500&ppuser=132695

I haven't been able to add photos to blogger for some reason, which is why I haven't uploaded for a while.

Here is a card I made for the Queen for the Day Challenge (click on the link above to go to my Splitcoast Gallery page for this card.)

Wednesday, January 2, 2013

Secret Garden FUN!

 
Playing with my fun new "Secret Garden" set and framelits!
I made this one for the challenges at Stampin' Royalty.
I used their colors from this week - not quite navy, soft suede, crumb cake and vanilla
and took some liberties with their sketch from last week!
Loved these colors - I had some patterned paper from the Festival of Prints DSP pack in these colors.
 
I used framelits and scoring.
The big blue flower is embossed with white and then I darkened some areas with blue marker.  The two smaller flowers I colored with 3 colors of maker.


This is one I made with "Secret Garden" yesterday.  I used an embossed frame with piercing and some framelits behind it.  The colors are cherry cobbler, pumpkin pie, vanilla and black.


Saturday, December 22, 2012

Sneak Peek - Secret Garden

 
Here are the cards I've made with the "Secret Garden" stamp set with matching framelits (die cuts).  So easy to use this set and cut out the flowers.  I love it!
 
I have paired all of these with the Apothecary Accents framelit.  And most of them use the new SAB DSP.
 
Don't forget to use the negatives!


Thursday, December 6, 2012

Male Birthday - You're Amazing

 
I'm really happy with how this card turned out!  A great male card, and quite easy to make!
 
The image is from "You're Amazing".  It is available as a single image!
My husband even agrees that it works for a male card!

 
I glued the zig zags on the black piece, then embossed with dots.

Thursday, November 29, 2012

New Queen... QFTD141

Here's the card I made for our Queen this week.
I hope you come play along with the Queen for the Day Challenge.
 
I cut out around the image and then put the black and green layers and ribbon behind it.


Tuesday, November 6, 2012

Chickadee Layered Framelits Retro

 
This card is for two "retro" challenges.
The "retro" color challenge at Splitcoast.  I used the colors Island Indigo, Lucky Limeade and Basic Gray.
 
The layout comes from Retrosketches.
 
 
I used two edgelits and two framelits and the die "little leaves".
I just love this chickadee image!

Monday, October 22, 2012

Last two with mom

Mom and I made our last 2 cards together before they went home today.  We had lots of fun together!
We each picked a layout and made a card.

The top card is the one she made.  She used a layout from Clean & Simple Stamping blog.

The layout I picked is from Retro Sketches.

Thursday, October 18, 2012

New Queen... QFTD135

 
My first time using this new Snowman stamp (Frosty Friends).  I colored the watercolor paper with watercolor crayons and blended with aqua painter.  I stamped the snowmen on white paper and cut all of them out (and snowballs).  The patterned paper is the new Festival of Prints Designer paper stack.
I also added some glitter on the snow.

 
This card is for Queen Claudia!  Come play along with the Queen for the Day Challenge on Splitcoast.