Showing posts with label sponging. Show all posts
Showing posts with label sponging. Show all posts
Wednesday, January 1, 2014
Saturday, November 23, 2013
Best of SNOW
Some cards featuring a new stamp set I got called "Best of Snow".
The first one I masked the oval shape and sponged inside, then stamped.
The bottom ones I used the window collections framelit shape and put a square behind it and used 3 embossed panels.
Labels:
Best of Snow,
Christmas,
Joyful Christmas,
masking,
piercing,
short & sweet,
sponging
Monday, May 20, 2013
Masking & Sponged
I masked the square shape with scrap paper and sponged it. Very simple card to make.
First I stamped the leaves, then masked them. I used apothecary accents framelit negative shape to mask and sponged it in with yellow. Another very simple card.
Labels:
Blooming with Kindness,
card,
framelits,
Gently Falling,
masking,
sponging
Monday, February 11, 2013
Sponging poppies to music
Playing with some new stuff! I made this card for the Queen for the Day Challenge that I host.
First I wheeled the music notes in blue (I was not precise and some of the notes are very faded looking - on purpose).
Next, I stamped my new Pleasant Poppies background stamp with versamark and embossed with PEWTER!
Then I sponged, then I crumpled, the sponged some more!
Added ribbon and brads.
I'm quite pleased with my first Pleasant Poppies card. Looking forward to using this stamp set often, it is so versatile!
Here's the closeup. I took this picture at night time and so the lighting is not good.
Labels:
card,
distressing,
embossing,
music,
Pleasant Poppies,
Queen,
sponging
Thursday, January 3, 2013
Queen myself - REDOs
Today what I decided to do for the Queen for the Day Challenge is that everyone gets to be Queen!
So you get to go through your cards from the last year and CASE yourself!
I've been having a very crafty time here as you can see. I made 5 redos.
This first card uses a heart mask and sponging with piercing. Colors - Marina Mist, white.
For this card I colored the flowers with two different colors, added some piercing and twine.
Colors - Island Indigo, Black, White, Not Quite Navy, new SAB patterned paper.
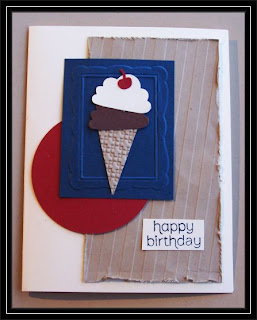
I used my square punch to punch out some fun colored patterned papers, glued it onto the card, then embossed! I used the apothecary accents shape with the sentiment from "You're Amazing"
Colors - Old Olive, Pacific Point, Pumpkin Pie, white
I embossed with stripes (on an angle) and distressed with edges of the kraft background.
The cone is simply a triangle (embossed with lattice) and the cupcake punch. I also used an embossed frame.
Colors - Vanilla, Crumb Cake, Cherry Cobbler, Midnight Muse, Choc Chip
Cut out the flower from Bloomin with Kindness and used some apothecary accents frames (pierced the dark purple one).
Colors - Crumb Cake, Wisteria Wonder, Elegant Eggplant.
Here are some small closeups.
Labels:
bird punch,
birthday,
Blooming with Kindness,
card,
cupcake punch,
embossed frame,
male,
masking,
Queen,
sponging
Monday, November 19, 2012
Blue & Gold Chickadee
I made this card for 3 challenges...
The challenge at The Paper Players was to use gold or silver. I embossed the bird image, the sentiment and the edges with gold.
Which fit right in with the technique at Splitcoast to emboss the edges. I used a versamark pen around the edge of the kraft paper and embossed it. I also sponged with blue. The sentiment is popped up over the decorative label punch and I added two pearls.
I got the layout from Sketch Frenzy Friday.
I am submitting this card for the design team tryout at The Paper Players.
Labels:
Beautiful Season,
card,
Christmas,
decorative label punch,
embossing,
sponging
Monday, November 5, 2012
Chickadee sketch frenzy
Another Christmas card! This one made with the Beautiful Season stamp set. I used the layout from Sketch Frenzy Friday.
The technique challenge today was to layer scallops! I glued two onto my soft suede background panel and then embossed it. Then I glued two more overtop.
Why, oh, why can't I get better photos?
The technique challenge today was to layer scallops! I glued two onto my soft suede background panel and then embossed it. Then I glued two more overtop.
I sponged and pierced and ripped! The sentiment is also colored in suede and green.
Why, oh, why can't I get better photos?
Thursday, October 25, 2012
New Queen... QFTD136
This card was inspired by our Queen this week. Come play along with the Queen for the Day Challenge on Splitcoast.
First I stamped the background wheel with crumb cake ink on the same color paper. I stamped one tree with versamark and embossed white. I stamped two trees with soft suede and I inked all the edges.
The sentiment (from Beautiful Season) and Four Frames is punched out and popped up and accented with pearls.
Labels:
Beautiful Season,
card,
Christmas,
Evergreen,
Four Frames,
Jolly Jingles,
Queen,
sponging,
vintage
Thursday, August 16, 2012
New Queen... QFTD126
I made these two cards for our Queen this week...
For this first one I brayered a sunset. This is what it looked like without stamping...
For this first one I brayered a sunset. This is what it looked like without stamping...
I masked off the bottom left corner with a piece of torn paper. I brayered yellow, then orange, then red. I took the paper off and sponged in brown and black in the bottom area (so it hopefully looks like a hill).
I stamped the trees with Staz On black, but it didn't show up as well as I wanted, so I colored the image in with black marker. I'm really pleased with how this turned out. The trees are from "Evergreen" and a retired set "Branch Out"
For this card I used my square punch and punched out 6 pieces of patterned paper. Added a piece of ribbon with a stapler, punched out the sentiment and pierced some holes and used a marker to connect the dots (faux stitching).
Really simple to make. I used some colors I don't normally put together and I'm happy with how it looks.
I really hope you come play along with the Queen for the Day Challenge.
Labels:
Branch Out,
brayer,
card,
Evergreen,
faux stitching,
Made for You,
Queen,
sponging
Friday, June 15, 2012
New QUeen.. QFTD117
Here are the 2 cards I made for this week's Queen. You can find the Queen for the Day Challenge here.
I used my new stamp sets Serene Silhouettes and Blooming with Kindness. New finishing touches edgelit and argyle embossing folder.
This card uses Serene Silhouettes and Made for You stamp sets! I did the Spotlight technique and I pierced around the circle with the new piercing template. Fun new ribbon!
Labels:
Blooming with Kindness,
card,
Made for You,
piercing,
Queen,
Serene Silhouettes,
sponging
Saturday, June 2, 2012
3 Punched Cards
This card uses the bird punch, paper daisies and boho blossoms punch, little leaves die, edgelits and the cupcake punch to sponge the clouds. This is the card we'll be making at my group meeting this afternoon.
The layout comes from Stamping 411.
For this card I wanted to show the cupcake punch used in a different way. I made a layered ice cream cone - yummy!
This card uses the layout from Freshly Made Sketches.
This card shows one of my favorite ways to use the bird punch! To make a candle!
It also uses the modern label punch.
I used this week's layout at Splitcoast.
Labels:
bird punch,
candle,
card,
Christmas,
cupcake punch,
embossed frame,
punch art,
sponging
Monday, March 26, 2012
Embossing - Faux Patina
The technique presented on Splitcoast today was called "Faux Patina". It was actually pretty easy.
First you ink or brayer onto your embossing folder. I used very vanilla paper and crumb cake ink. After the pattern is embossed you then choose a few colors of ink to sponge directly onto the embossed piece. I used two shades of blue and green. Then you use versamark and gold embossing powder to highlight the areas you want - I used the versamarker to just put a little bit of gold.
I first cut out the top note shape before doing the rest of the technique. I love this shape - its so versatile! I used the "back side" of the dotted ribbon and a vintage brad.
The sentiment is layered on the large oval punch and decorative label.
I used the piece of Top Note that I trimmed for the INSIDE of the card!
This technique will be so versatile! You can use any embossing folder and any colors, making it darker or lighter and adding more gold! I hope to remember to try this again. It was really fun and quite easy!
Wednesday, September 16, 2009
Happy Fall!

Yes, I did say HAPPY fall. I hope you can enjoy your day and the new season with all its changes.
Some highlights about this card:
Crystal Effects - I covered the pumpkin with crystal effects to give it shine!
Sponging - Even a little bit of sponging around the edge of the image can give it an extra special touch.
Tone on Tone - This is the first time I've tried this. I cut a strip with my scallop edge and put it right next to the same color cardbase.
Colors: Very Vanilla, Pumpkin Pie, Chocolate Chip, To the Nines Specialty DSP, Mellow Moss
Stamps: Thoroughly Thankful, Autumn Days
Subscribe to:
Posts (Atom)


